Guide to mapping
Getting Started
Once you download BYOND, you also download the prerequisite programmes for mapping, so don't worry! To actually contribute your maps to a project, you will however need Github. You can get away without using Github and have someone do all that final work for you, however, it is strongly advised you set up Github now before proceeding.
- Setting up Github
- Visit Github to download the desktop client; download it.
- Visit the Citadel Github page, or alternatively, the Github page for whatever codebase you want to work on.
- Click the green "Clone or download" button (top right of the table of folders) and 'Open in Desktop'.
- On the Github website, you can create a new branch using this guide. On Desktop
- On Github Desktop, click the branch tab, then new branch (or Ctrl+Shift+N). Create a branch based on master.
- Update your Master branch if necessary. Click 'Current Branch' on Desktop, choose a branch to merge into master and filter for upstream/master. Merge it, baby!
- Never make anything on the Master branch. Keep your Master branch updated and clean from changes, always update before creating a new branch.
- Click 'Current Branch' and change to your new branch. All of your changes should occur on this branch now.
- Getting into Dream Maker.
- Open Dream Maker (dreammaker.exe).
- Click File -> Open Environment
- Go to Documents -> Github -> Repository Name -> tgstation.dme
- Click File -> Open ->
- Go to Repository Name -> _maps -> map_files -> Pick a map -> MapName.dmm (Make sure you are not filtering file types at the bottom of the window)
- Click Layers -> Only Show Selectable Layers, then click either Ctrl+1 or Layers -> Area.
Congratulations! You should now have a map file open. Try opening a classic, like Box Station and having a look around.
Using Dream Maker
Dream Maker doesn't take long to get used to.
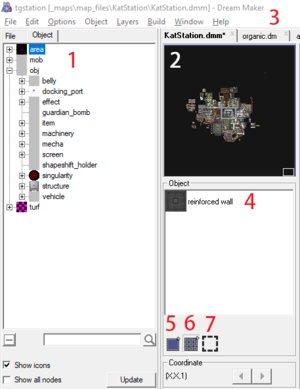
- The object tree, the objects you can place are here.
- The minimap. you can click this to quickly jump to a location.
- Tabs. Like Photoshop, your maps, code files and sprite files are all in tabs. You can copy and paste from one tab to another.
- Your active object. This is what you place when you click. Other instances of an object will appear in this window too. An instance is a variation of an object.
- Single placement tool. You place tiles one at a time with this tool.
- Area placement tool. You place tiles in a rectangle with this tool. Useful for building large areas fast.
- Marquee selection tool. You can select a rectangle and move it around, as well as copy and paste.
Here are some hotkeys.
- Ctrl+Click Place an object on top of another object. You will need to do this to put wires on top of pipes, for instance.
- Ctr+Shift+Click Make whatever you click on into your active object.
- Shift+Click Delete the top-most item. Note: If you have a turf selected, this will delete a turf. If you have an object selected, it will delete an object.
- Ctrl+MouseWheel Scroll around the map horizontally.
- Ctrl+Shift+MouseWheel Scroll around the map horizontally very fast. Note: Obviously, don't hold Ctrl to scroll vertically.
