User:Quacks/Testing: Difference between revisions
Small edit |
Added a bit about uploading files |
||
| Line 1: | Line 1: | ||
=Basic Editing= | =Basic Editing= | ||
This section of the guide to wiki contribution will cover some of the basics. Things such as creating new pages, editing existing pages and articles along with uploading files. | |||
<div class="toccolours mw-collapsible mw-collapsed" style="width: 80%;"> | <div class="toccolours mw-collapsible mw-collapsed" style="width: 80%;"> | ||
==Creating new pages== | ==Creating new pages== | ||
| Line 12: | Line 13: | ||
* '''Step 4:''' Saving your changes is done by pressing the blue save page button at the bottom of the text editor. If you want to detail some of the changes you have done or what kind of page you have created you can give a short little summary in the text box beneath ''Summary:'' in the editor. Anything you put in there will be shown in the change log. | * '''Step 4:''' Saving your changes is done by pressing the blue save page button at the bottom of the text editor. If you want to detail some of the changes you have done or what kind of page you have created you can give a short little summary in the text box beneath ''Summary:'' in the editor. Anything you put in there will be shown in the change log. | ||
'''Miscellaneous Notes:''' | <span style="font-size:120%">'''Miscellaneous Notes:'''</span> | ||
* Try and keep your page names short and to the point and do not make them overly long. (This will only result in a mess when you try to link or display the name of a page with a really long name) | * Try and keep your page names short and to the point and do not make them overly long. (This will only result in a mess when you try to link or display the name of a page with a really long name) | ||
* Always capitalize the first letter of a page name. | * Always capitalize the first letter of a page name. | ||
| Line 21: | Line 22: | ||
<span style="font-size:1.2em;">A detailed explanation on how to edit pages with the two different editors.</span> | <span style="font-size:1.2em;">A detailed explanation on how to edit pages with the two different editors.</span> | ||
<div class="mw-collapsible-content"> | <div class="mw-collapsible-content"> | ||
'''Disclaimer: This section will mostly cover the Source editor (Text editor) For help with the visual editor see: [https://www.mediawiki.org/wiki/Help:VisualEditor/User_guide Mediawiki's guide]'''<br> | <span style="font-size:120%">'''Disclaimer: This section will mostly cover the Source editor (Text editor) For help with the visual editor see: [https://www.mediawiki.org/wiki/Help:VisualEditor/User_guide Mediawiki's guide]'''</span><br> | ||
So you need to edit a page for some reason? It might be out of date, you might have found a spelling error or other incorrect information. Whatever it is that warrants the need for a change this quick step by step guide will help in getting your footing with editing a page on the wiki. | So you need to edit a page for some reason? It might be out of date, you might have found a spelling error or other incorrect information. Whatever it is that warrants the need for a change this quick step by step guide will help in getting your footing with editing a page on the wiki. | ||
[[File:Wiki guide example 3.png|448px|thumb|right|Figure 2]] | [[File:Wiki guide example 3.png|448px|thumb|right|Figure 2]] | ||
| Line 47: | Line 48: | ||
* '''Step 2.1: Editor explanation (Visual editor):''' Mediawiki does a much better job at explaining the visual editor than I ever could so for a guide and explanation to it see: '''[https://www.mediawiki.org/wiki/Help:VisualEditor/User_guide Help:VisualEditor/User guide] | * '''Step 2.1: Editor explanation (Visual editor):''' Mediawiki does a much better job at explaining the visual editor than I ever could so for a guide and explanation to it see: '''[https://www.mediawiki.org/wiki/Help:VisualEditor/User_guide Help:VisualEditor/User guide] | ||
<span style="font-size:120%">'''Miscellaneous Notes:'''</span> | |||
*Try to always use the Summary window or describe your changes to the bare minimum using it please. | |||
</div></div> | |||
<div class="toccolours mw-collapsible mw-collapsed" style="width: 80%;"> | |||
==Uploading files== | |||
<span style="font-size:1.2em;">Where and how to upload images and other files onto the wiki in a quick and easy guide.</span> | |||
<div class="mw-collapsible-content"> | |||
At some point on some random page an image or other file will become outdated and need replacing. Usually these files are flagged with the [[:Category:Needs revision|needs revision]] tag and can be found in that respective category. A full list of all files on the wiki can be found under the [[Special:ListFiles|file list]] This short guide will teach you how to upload files and some good etiquette when it comes to files on the wiki. | |||
[[File:Wiki guide example 5.png|thumb|right|256px|Figure 4]][[File:wiki guide example 6.png|thumb|right|256px|Figure 5]] | |||
To upload a file onto the wiki simply click on '''Upload file''' in the sidebar (See Figure 4).<br> | |||
Alternatively you upload files through broken file links by simply clicking on them and submitting the right file. To see a broken file link see Figure 5 | |||
When you have followed either of the following methods you will find yourself on the upload file page. Here you can select a file from your computer, give it a name (Unless it already has one defined), Add a small summary describing the file or just adding key words into the summary and lastly upload it. | |||
[[File:Wiki guide example 7.png|512px]]<br> | |||
'''(1)''' You select the file from your computer here.<br> | |||
A file may have a maximum size of 8 MB and only the following file types are accepted: <u>''png, gif, jpg, jpeg, webp.''</u><br> | |||
(It is good practice to upload files or icons from the game in 64x64 and as a .png, given these Icons are not animated or larger than 64x64) | |||
'''(2)''' Is a simple textbox that will determine the name of the file once its uploaded.<br> | |||
Try to keep this as simple and short as possible. Capitalize the first letter of the name (applies if the file name has multiple words or one) and keep the name relevant to the file. Aka, Don't use complex names or random numbers and letters, this will only make finding said file a complete nightmare. | |||
'''(3)''' Has both the Summary box and the licensing options, the latter of which is not that important. When you upload a file please enter either the name of the file or some keywords that relate to the file into the summary. Doing this will help immensely with having the search functions on the wiki actually find the file when searched for. For example: [[Media:Herb seeds.png]] has the following key words in the summary: ''Herb seeds''. As said previously the licensing options are not important and can be ignored. | |||
'''(4)''' These are the Upload options, they are two simple tick boxes the first of which will determine if the file will end up on your [[Special:Watchlist|watchlist]] or not. The second will when ticked, ignore any warnings that ''could'' come from uploading a file. Warnings can be stuff like duplicate warnings so its generally good to leave this un-ticked. | |||
'''(5)''' All the way the bottom you can find the upload button. When you have everything set you can hit this and your file will be uploaded onto the wiki! | |||
<span style="font-size:120%">'''Miscellaneous Notes:'''</span> | |||
* As said before, files should be uploaded in 64x64 if they're icons from the game (Stuff like items, machines, etc) | |||
* Gifs and images should always be relevant to either the game or the point that you are trying to make on the page. If having some media on a page helps getting your point across feel free to use it! | |||
* Uploading memes, your OC or any other form of non-relevant media will get your wiki account blocked and said media deleted. | |||
* When you upload a new version of an image or any other piece of media it will take a while for the cache to update the change. So dont panic when you see the old Icon listed twice after you uploaded a new one. | |||
</div></div> | </div></div> | ||
Revision as of 11:19, 10 July 2022
Basic Editing
This section of the guide to wiki contribution will cover some of the basics. Things such as creating new pages, editing existing pages and articles along with uploading files.
Creating new pages
A quick and easy explanation on how to create new pages. For making stuff such as guides or whatever your project is!
Alright, you need to create a page for a personal project, a guide to write or do whatever with. To do this follow the quick and easy steps listed below!
- Step 1: Type the name of the page you want to create into the search bar on the top right and hit enter.
- Step 2: You will now see the results of your search. Depending on what you typed into the search bar you might get some results from different pages that have words that match your search but that is not important. To create the page click on the red bit of text. (See Figure 1)
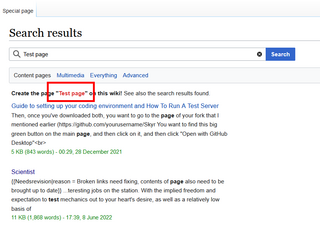
Figure 1 - Step 3: After you clicked on the red bit of text it will have re-directed you to an empty page with the name you typed into the search bar. In here you are free to create, type or put whatever and use it how you see fit.
- Step 4: Saving your changes is done by pressing the blue save page button at the bottom of the text editor. If you want to detail some of the changes you have done or what kind of page you have created you can give a short little summary in the text box beneath Summary: in the editor. Anything you put in there will be shown in the change log.
Miscellaneous Notes:
- Try and keep your page names short and to the point and do not make them overly long. (This will only result in a mess when you try to link or display the name of a page with a really long name)
- Always capitalize the first letter of a page name.
Editing a page
A detailed explanation on how to edit pages with the two different editors.
Disclaimer: This section will mostly cover the Source editor (Text editor) For help with the visual editor see: Mediawiki's guide
So you need to edit a page for some reason? It might be out of date, you might have found a spelling error or other incorrect information. Whatever it is that warrants the need for a change this quick step by step guide will help in getting your footing with editing a page on the wiki.

- Step 1: Navigate to the page you want to edit and click Edit source or Edit (See Figure 2)
(Clicking Edit source will bring up the text editor while Edit brings up the visual editor)
- Step 2 (Edit - Source/Text editor): You will now have the text editor open and be confronted with a window that looks like the following: (See Figure 3)
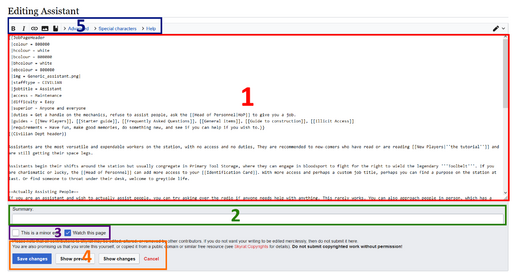
- Step 2.1: Editor explanation (Source/text editor): See figure 3 and the text explanation below here.
(1) In the middle of the screen and highlighted with red (1) is a large text box. This is the actual contents of the page (In text form), anything changed or added there will show up when the page is edited.
(2) Beneath that, and highlighted with green (2) is the summary box. This small text box can be used to describe any changes you made. When you save your edit and you described your changes in the summary box, that small summary will be shown in the change log in: Recent changes as well as the change log of the actual page itself. The button to view the change log of any page is located right next to the Edit and Edit Source buttons on the top right side of any page.
(3) Underneath the Summary box you can find two little buttons highlighted with purple (3). You can either tick or un-tick these and nothing else. Ticking the This is a minor edit box will mark the edit you made as minor. You can do this if the changes you made did not affect the contents of the page too much or if it was a simple small edit. (Edits smaller than 500 bytes will automatically be marked as minor) The button next to that will simply decide if the page will be added to your Watchlist when you save the edit.
(4) Highlighted with Orange (4) and at the bottom of the editor four buttons can be found. All of which will be explained in their listed order:
- Save changes: Simply saves the edits and changes you made to the page, updating it to the newly revised version you made.
- Show preview: Will show you a preview of the edit you are currently working on. Remove some words from (1) and add a few in another and hitting show preview afterward will show you the changes you made in the normal way the page is always displayed.
- Show changes: Shows a comparison and differences between the last revision of the page and the current edit you are working on. This difference is shown in a simple text format with things that have been removed highlighted in yellow, and new additions shown with blue.
- Cancel: Simply cancels your edit and closes the Editor.
(5) And lastly at the very top of the editor, highlighted with blue (5) is a helpful hot bar. This hot bar has buttons for: Adding bold text, Italic text, images, links and a whole lot more advanced and special functions listed underneath the drop-down menus for Advanced and Special characters. If you ever feel lost or forgot how to do something basic like linking to stuff on the wiki the drop-down menu underneath Help provides some great explanation to some of the more basic functions of the wiki.
- Step 2 (Edit - Visual editor): After clicking Edit you will be re-directed to the visual editor. The visual editor is an amazing and a very powerful tool. Its main strength comes from the fact that you can preview your edit as you're working on it. Given its nature is that you edit the text as its shown on the page, instead of working within a text-box like the source editor has.
- Step 2.1: Editor explanation (Visual editor): Mediawiki does a much better job at explaining the visual editor than I ever could so for a guide and explanation to it see: Help:VisualEditor/User guide
Miscellaneous Notes:
- Try to always use the Summary window or describe your changes to the bare minimum using it please.
Uploading files
Where and how to upload images and other files onto the wiki in a quick and easy guide.
At some point on some random page an image or other file will become outdated and need replacing. Usually these files are flagged with the needs revision tag and can be found in that respective category. A full list of all files on the wiki can be found under the file list This short guide will teach you how to upload files and some good etiquette when it comes to files on the wiki.
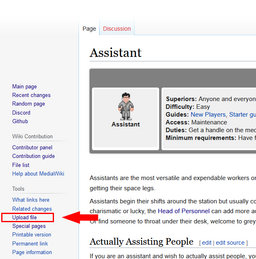
To upload a file onto the wiki simply click on Upload file in the sidebar (See Figure 4).
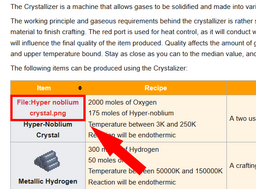
Alternatively you upload files through broken file links by simply clicking on them and submitting the right file. To see a broken file link see Figure 5
When you have followed either of the following methods you will find yourself on the upload file page. Here you can select a file from your computer, give it a name (Unless it already has one defined), Add a small summary describing the file or just adding key words into the summary and lastly upload it.
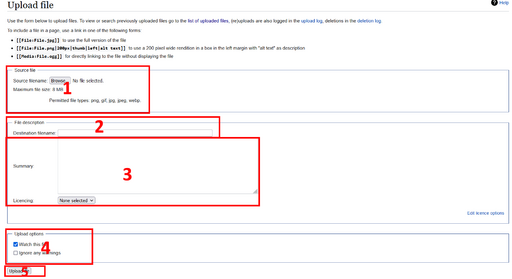
(1) You select the file from your computer here.
A file may have a maximum size of 8 MB and only the following file types are accepted: png, gif, jpg, jpeg, webp.
(It is good practice to upload files or icons from the game in 64x64 and as a .png, given these Icons are not animated or larger than 64x64)
(2) Is a simple textbox that will determine the name of the file once its uploaded.
Try to keep this as simple and short as possible. Capitalize the first letter of the name (applies if the file name has multiple words or one) and keep the name relevant to the file. Aka, Don't use complex names or random numbers and letters, this will only make finding said file a complete nightmare.
(3) Has both the Summary box and the licensing options, the latter of which is not that important. When you upload a file please enter either the name of the file or some keywords that relate to the file into the summary. Doing this will help immensely with having the search functions on the wiki actually find the file when searched for. For example: Media:Herb seeds.png has the following key words in the summary: Herb seeds. As said previously the licensing options are not important and can be ignored.
(4) These are the Upload options, they are two simple tick boxes the first of which will determine if the file will end up on your watchlist or not. The second will when ticked, ignore any warnings that could come from uploading a file. Warnings can be stuff like duplicate warnings so its generally good to leave this un-ticked.
(5) All the way the bottom you can find the upload button. When you have everything set you can hit this and your file will be uploaded onto the wiki!
Miscellaneous Notes:
- As said before, files should be uploaded in 64x64 if they're icons from the game (Stuff like items, machines, etc)
- Gifs and images should always be relevant to either the game or the point that you are trying to make on the page. If having some media on a page helps getting your point across feel free to use it!
- Uploading memes, your OC or any other form of non-relevant media will get your wiki account blocked and said media deleted.
- When you upload a new version of an image or any other piece of media it will take a while for the cache to update the change. So dont panic when you see the old Icon listed twice after you uploaded a new one.
